
Why Digital Signing Matters
Last updated 2009-09-15.
The Need for Digital Signing
Nowadays, the content you post on the Internet is a determinant of your reputation.
Most people are sufficiently net-savvy to realise that what they post under their own names online is easily searchable, and will persist on the Internet for years (maybe longer than the lifetime of the individual poster). A quick search will even turn up the original post to comp.os.minux by Linus Torvalds, announcing the new operating system called Linux ("just a hobby, won't be big and professional like gnu").
Given how important digital content is, it becomes important that people are able to know that something purporting to be written by you was really written by you, and that it if it was, that it hasn't been tampered by anyone since you wrote it.
The solution to this problem is to digitally sign your posts and emails.
How Do I Digitally Sign Text?
The process is pretty straightforward. First you need to create yourself a digital key. This key has two parts; a private or secret key that you use to sign text, and a public key that you make available to everyone, that is used to verify the text you have signed.
Courtesy the near-magic of public-key cryptography, your public key can only be used for verification, not for signing. This means that people can use your public key to verify your signatures, but not to create signatures purporting to be yours.
Next, you need to put your public key somewhere that people can get it. The usual practice is to upload it to a trusted key repository, and put a link to it somewhere on your blog, homepage, etc.
Finally, you need to use your secret key to sign text that you email or post. Signing appends a block of text under what you've typed; anyone who doubts the providence of your post can use your public key to verify both the fact that you created the signature, and that the signature exactly matches the text you typed. This way, both forgery and editing are prevented.
The following steps explain the simplest way of signing text on a computer running Microsoft Windows.
Creating Your Key
- Download GnuPT (a.k.a. WinPT) and install it, accepting all default options.
- You should now have a key icon in your system tray. Right-click on it and choose 'Key Manager'
- From the menu, choose Key -> New -> Normal.
- You will be prompted to enter your name, and your email. Then, you will be prompted to choose a password. Pick a good one - make it long, and choose one that contains upper and lower case letters, punctuation, and numbers. Do not forget it, and do not tell anyone what it is, ever. Once a key has been created there is no way of changing the password without providing the original, and no way of retrieving the original from the key. You will not be able to use your key without remembering your password.
- Decline to back up your keyring for the moment; instructions on backing up your keyring will follow.
Signing Text
- Open Notepad, and type in some text. Copy it to the clipboard.
- Right-click on the WinPT icon, choose Clipboard -> Sign.
- You'll be prompted to enter the password you chose earlier.
- Once WinPT has finished, go back to Notepad and paste from the clipboard. You should see your original text, plus the signature generated with your secret key, all in a special format:
-----BEGIN PGP SIGNED MESSAGE-----
Hash: SHA1

Hello world!
-----BEGIN PGP SIGNATURE-----
Version: GnuPG v1.4.9 (MingW32) - WinPT 1.4.0
Charset: UTF-8

iEYEARECAAYFAkokl14ACgkQtQ7NU9SJcycy3gCfaznUx6aD1TCa00NNYxx7erLh
jc8An33DTPMwFqha6gKG5G3CwcLTjoY1
=g5uw
-----END PGP SIGNATURE-----
- You can then paste all of that text into an email program, online forum, etc. secure in the knowledge that anyone can use your public key to verify the signature.
Sharing Your Public Key
- Right-click on the WinPT icon, choose 'Key Manager...'.
- You will see a list of keys; at the moment, it'll only have yours. Right click on your key, and choose 'Copy Key to Clipboard'. Note that this will copy only the public key - that is, the bit that you want to share.
- Open up a web browser, and visit http://http-keys.gnupg.net/.
- Near the bottom of the page is the heading "Here's how to add a key to the server's keyring". Paste your public key into the box below that. Your public key should look a little like this:
pub 1024D/D4897327 31/05/2009 Duncan Bayne
- Click "Submit this key to the keyserver!".
- You can check this worked by going back to http://http-keys.gnupg.net/ and searching for your key. Just type in your Key ID from the Key Manager, and click "Do the search!".
- Now, you can tell people something like "My public key ID is 0xD4897327, and is available from gnupg.net." That way signing-savvy people (like you!) can verify your signatures.
Verifying a Signature
This is how to verify the message "I like dogs", which has been signed with a demonstration key:
-----BEGIN PGP SIGNED MESSAGE-----
Hash: SHA1

I like dogs.

-----BEGIN PGP SIGNATURE-----
Version: GnuPG v1.4.9 (GNU/Linux)

iEYEARECAAYFAkqtpogACgkQTNZh8Z3fgHwC3gCeKrKaUm4zvzd92WjuNd3L1no+
AZkAn1KHFHVzmFdFqn9lYPhrqFK/R250
=hZQW
-----END PGP SIGNATURE-----
- Click on this link to download the demonstration key. When prompted, choose to open the file with WinPT. This will import the demonstration key into your keyring.
- Copy the above text block (including "-----BEGIN PGP SIGNED MESSAGE-----" and "-----END PGP SIGNATURE-----") into the clipboard.
- Right-click on the WinPT icon, and choose Clipboard -> Decrypt/Verify.
- WinPT will verify that the signature is good, and show you that it was signed with the secret key corresponding to the demonstration key that you imported in step 1.
- To prove that tampering is detected, paste the text block into Notepad and change "I like dogs" to "I hate dogs". Copy the text from Notepad, and verify it using WinPT. It will report "The signature is BAD!"
Backing Up Your Key
- Right-click on the WinPT icon, and choose "Key Manager..."
- Click on your key, and choose Key -> Export Secret Key.
- Choose a filename to use for your secret key and click Save.
Be very, very careful not to let the secret key file you just saved get into the wrong hands. Make a copy of that file (say, on CD or USB keychain) then delete it.
Remember that anyone who gets their hands on your secret key can very easily pretend to be you.
Firefox and Gmail Integration
If you use Firefox there is an excellent add-in called FireGPG. Once you have followed the above steps and installed and set up WinPT, download and install FireGPG.
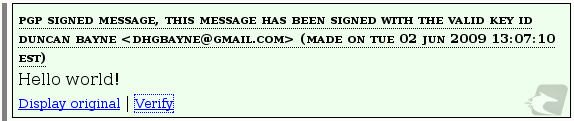
The first thing you'll notice when using FireGPG is that it builds support for verifying signatures right into Firefox. If it sees a block of signed text in a page, it replaces it with a summary, and a link to verify in-place. For example, one of the plain text blocks in this article turns into:
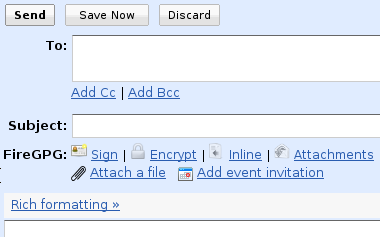
Secondly, FireGPG adds a series of handy buttons to Gmail that allow you to easily sign your emails without going through the clipboard. It even adds the signature as a discreet attachment, so your emails aren't cluttered up with the signature.
When you receive an email signed with a key that's already in your WinPT keychain, FireGPG will add a little green 'Signed mail' icon.